10 ways to install your Metalbird
Even though our Metalbirds are designed for two installation methods – trees or ground – that doesn’t mean that you can’t get a bit creative! Our birds are art for your garden! And that’s what art is all about right? Expressing yourself. So if you have a unique idea to install your bird, then we say “go for it!”
Need ideas? Here’s just a few to get those creative juices flowing! And don’t forget to show us what you come up with!HERE ARE OUR TOP 10 WAYS TO INSTALL YOUR METALBIRD
1. Trees

It’s an oldie but a goodie – Installing your bird into a tree makes them look right at home, up amongst the branches. Make sure to perch them up high so as to create a silhouette against the sky or your chosen background. This brings your Kookaburra, Fantail or whichever Metalbird you’ve chosen, to life! (figuratively, of couse)
To get that ‘real bird’ look, simply, firmly hold on to your bird and tap the flat end of the 'branch' with a hammer to bury the tip about 3mm into the tree. If you’re finding it difficult to hammer in your Metalbird, you’re probably dealing with a harder wood – try drilling a small pilot hole before hammering your it in.
And we know what you’re thinking! But doesn’t that damage the tree? Not at all! The tree will naturally seal off around the Metalbird is installed to protect itself from disease. We have some Metalbirds that are seven years olf and the trees are showing no harm whatsoever!
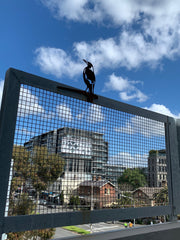
2. Fences

Another Metalbird classic, our Birds on Water range look fantastic installed into fences.
Why have just a plain wooden fence, when you can beautify it with some uniquely Australian garden art?
To make your neighbours jealous and install your Metalbird in the top of a fence, you’ll only need to Metalbird. You can pop the peg provided to the side. Then, simply take a handsaw and saw a groove into the top of your fence. Firmly grasp the Metalbird and tap the top of the feet to push it into the groove. If you tap the Metalbird at its head, you risk bending the Metalbird out of shape.
Finally, look up at your new art piece and just wait for the neighbours to ask you where you got it from!
3. Post

Photo by flock member, Don.
So you’re thinking to yourself, “but I don’t have any trees!”. Don’t worry – we’ve got you covered! Posts make a great spot to display your Metalbird and give you the flexibility to install your Metalbird wherever you like, even if you don't have a garden!
Metalbirds look great installed in a post on your apartment balcony, your deck or even a street lamp post if you'd like to make like Banksy and share the Metalbird love with your community.
The post acts much like a tree and follows a very similar installation process. All you need to do is firmly hold on to your Metalbird and tap the flat end of the 'branch' with a hammer to bury the tip about 3mm into the post. Some woods make it more difficult to hammer the bird in, so you may need to drill a small pilot hole first!
4. Pergolas

Photo by flock member, Zoe.
Have you got a Pergola in your garden? Lucky you! Installing your Metalbird into the top of a pergola as flock member, Zoe, has done here is a fantastic way to display your Metalbird nice and high to make the most of the beautiful silhouette that it creates.
To install your Metalbird into the top of a pergola, simply use a handsaw to create a small groove in the top. Using a hammer, lightly tap above the feet of the Metalbird to push it into the wood. If you tap the Metalbird at its head, you risk bending the Metalbird out of shape.
5. House

Here’s one you might not have thought of - Metalbirds also look fantastic when installed into a bargeboard (the board on the edge of your roof). Bargeboards make the perfect display for our Metalbirds as they are situated high up meaning they can be silhouetted against the sky and show off the Metalbirds unique design.
To install your Metalbird into your bargeboard, simply tap the flat end of the 'branch' lightly with a hammer to embed the Metabird about 3mm into the timber. If you’re finding it difficult to hammer in your Metalbird, you’re probably dealing with a harder wood – try drilling a small pilot hole before hammering your Metalbird in.
6. Brick

We know what you’re thinking! This one’s impossible! Well, it’s not! That’s right, you can even install your Metalbird into a brick wall! We know not all houses have gardens to suit, or are made of timber so if you have a brick house, why not give this a shot? Or you can become the new Banksy and share your Metalbird with the world by installing your Metalbird into a public place like we did with our first Metalbird at Jolimont station in Melbourne.
To do the impossible and install your Metalbird into a brick wall, use a drill to make a small hole in the cement in between the bricks. Using a hammer, lightly tap the flat end of the 'branch' to push the Metalbird into the hole.
7. Flat against wall 
Photo by flock member, David. 
Photo by flock member, Tracey.
We often get the asked the question "how do I install my Metalbird flat against the wall?" And it's a question that really gets us excited! We love to see customers embracing their own creativity and art expression by installing Metalbirds in a unique way.
You can install your Metalbird flat against an exterior or interior wall and for added wow factor, install it slightly off the wall to show off your Metalbird's wonderful shadow.
To install your Metalbird flat against a wall, simply apply a strong double-sided tape such as 3M outdoor tape to one side of your Metalbird and press firmly to attach it to the desired wall.
8. Timber post on table


Live in an apartment or renting? No problem! You can still have a Metalbird! Simply source a timber post from your local hardware shop and place it somewhere up high so as to show off your new Metalbirds stunning silhouette. This way you can move it around, make it your outdoor table centrepiece - the world (or your garden) is your canvas!
To install your Metalbird into a timber post, grip your Metalbird and tap the flat end of the 'branch' with a hammer to bury the tip about 3mm into the post. Depending on the timber that your source, you may find it a bit difficult and need to drill a small pilot hole first.
9. Branch, flat against balustrade
Another go-to for apartments! Installing your Metalbird flat against a balustrade is the perfect way to show off your new Metalbird in any home or garden.
To install your Metalbird flat against a balustrade, simply drill two holes in the ‘branch’ of the Metalbird and two matching holes in the balustrade, then use a self-tapping screw to secure it.
10. Dowels in pot plant


This is one of our favourite installation ideas! These look fantastic as a way of adding some interest to your pot plants at home and shows off your Metalbird at its best. House plants are everyone’s obsession at the moment and we may be a bit biased but we think they look even better with a Metalbird in them!
All you need to do to achieve this is purchase a dowel from your local hardware store. Then firmly hold on to your Metalbird and tap the flat end of the 'branch' with a hammer to bury the tip about 3mm into the dowel.
Now that you've got all this inspiration, it's time to get installing! Already have your Metalbird? Send us a pic of how you've installed it, we always love to see where our Metalbirds end up!
Don't have a Metalbird yet but feel inspired? What are you waiting for!? Get shopping!
Sample Block Quote
Praesent vestibulum congue tellus at fringilla. Curabitur vitae semper sem, eu convallis est. Cras felis nunc commodo loremous convallis vitae interdum non nisl. Maecenas ac est sit amet augue pharetra convallis nec danos.
Sample Paragraph Text
Praesent vestibulum congue tellus at fringilla. Curabitur vitae semper sem, eu convallis est. Cras felis nunc commodo eu convallis vitae interdum non nisl. Maecenas ac est sit amet augue pharetra convallis nec danos dui.
Cras suscipit quam et turpis eleifend vitae malesuada magna congue. Damus id ullamcorper neque. Sed vitae mi a mi pretium aliquet ac sed elitos. Pellentesque nulla eros accumsan quis justo at tincidunt lobortis denimes loremous. Suspendisse vestibulum lectus in lectus volutpat, ut dapibus purus pulvinar. Vestibulum sit amet auctor ipsum.


FREE PERSONAL MESSAGE INCLUDED